Sea Green and Sapphire

A blog about textiles and colour


13 Comments

Moody and Unstable Colours from Purple Basil

Purple basil leaf

With its sharply serrated leaves that are an ominous shade of very dark blood red, purple basil is a plant that exudes gothic drama. Its sombre and gloomy looks are in contrast with its delightful anise-seed scent and unexpectedly pretty lilac coloured flowers. For such a dramatic looking herb, it is perhaps fitting that, when used for dyeing, it gives moody, unstable and entirely unexpected colours.

The colour of the dye bath – a suitably gothic shade of purple black – may get you excited but the eventual colour you get is completely different. And the dye reacts to pH, so it gives you plenty of opportunities for playing around with colour modifications, but even this process can lead to some frustrating surprises.

Purple basil flower

Growing purple basil is very easy, the only complication for those of us living in colder climates is that it is a tender plant, needing somewhere warm to grow until the frosts are over. I propagated mine in a heated propagator in an unheated greenhouse, but a warm window sill would be perfectly adequate. The seeds germinated well and I got plenty of plants which were growing fast. Although I had intended to transplant them into a flower bed in June, this year it was very chilly even at that point so I ended up leaving them in the greenhouse, where they grew perfectly happily in one litre pots.

Purple basil is of course edible too. It has a distinct anise seed taste, so it is closer to Thai basil than the usual green variety, although I have seen a recipe for a purple basil pesto which I definitely want to try to make one day.

I picked my first harvest in the middle of July, and by now – early September- the plants are pretty large again, ready for a second harvest. I placed the stems and leaves in a pot, poured boiling water over them and simmered for about an hour. The dye bath was a wonderfully dark purple, and I was getting very excited anticipating the colours I imagined I would get.

A few days later I put some alum mordanted wool and silk in the pot, and simmered them for about an hour. Watching the fibres in the pot, I quickly realised, with slight disappointment, that they looked very dark grey, not purple at all.  The biggest surprise, however, came as I lifted the fibres up – the dark colour was just an illusion: as the dye liquid drained away from the fibres, my wool top was very very insipid light grey colour, it was as if the dye was not sticking to the wool at all. Having said that, my silk skeins absorbed the colour very well and were by now very dark steely grey.

In fact, I had been warned about the fact that the dye does not stick to wool very easily, so I just left the fibres in the pot in the sun for a week or so, might even have been two, before proceeding with the modifications. I had also put some of the dye liquid and wool in a solar dyeing jar for the same amount of time, and this seemed to work just as well as the pot that had been simmered, so with this dye it is definitely time that is the important factor, not high heat.

After a few weeks of solar dyeing, my wool skeins and top were light-ish stormy grey, with a hint of blue if you looked very closely. I then did my usual colour modifications with acid, alkali and iron. The acid made wool very slightly greyer but with silk came the most pleasant surprise of all – I got a wonderfully plummy purple colour. Alkaline after-bath turned both fibres greener, the wool in particular became a nice light soft green. Iron on the other hand just made wool even murkier and gloomier, so it wasn’t really worth the effort. With silk iron darkened the grey in a nicer way, so that may well be an effect that one might want to achieve. I didn’t rinse my fibres at this point, as I had read it’s better to leave them to dry unrinsed, and then rinse and wash them a few weeks later.

Alum mordanted Finnsheep top dyed with purple basil

Alum mordanted Finnsheep top dyed with purple basil

I had also dyed some copper-mordanted felt samples, but these became very dull grey, more or less the colour your paint brush rinsing water ends up after a water colour painting session, so it is not really worth bothering with.

Perhaps because this was the first dyeing session of the year, I didn’t label my samples, I really do not know what I was thinking (if anything…).  I think it must have been that at the time I thought I’ll be able to tell the difference (usually a big mistake). Well, after about two weeks, when I got back to my dried samples, the colour differences were not nearly as prominent as they had been straight after dyeing, my little felt sample squares had all become the same slightly murky grey, really could not tell them apart.

And the colours on the other sample fibres did not prove to be very stable either: the lovely purple silk skein was no longer purple, it had become a mottled mixture of grey and fawn. The bluey-grey wool top was no longer very blue, that too had become a slightly murkier grey colour. Only the wool that had received the alkaline treatment was still noticeably light green.

All my sample colours, regardless of the treatment they had had, somehow ended up the same shade of very gloomy and dull grey.

All my sample colours, regardless of the treatment they had had, somehow ended up the same shade of very gloomy and dull grey. And no amount of playing with the white balance setting on my camera made it possible to reproduce those colours accurately.

Unlike wool, silk absorbs purple basil dye easily, giving you some nice steely greys. The purple colour from the acid treatment proved unstable, it is the skein right at the bottom.

Unlike wool, silk absorbs purple basil dye easily, giving you some very nice steely blue-greys. The purple colour from the acid treatment proved unstable, it is the skein right at the bottom which became a slightly mottled mixture of grey and fawn.

Finnsheep top dyed with purple basil. The wool in front - a pale bluey grey - is the unmodified colour on alum mordanted wool. In a wash this lost some of its blueness, and became a bit more green. The two at the back are the more greener versions from an alkaline bath. The light green colour.

Finnsheep top dyed with purple basil. The wool in front – a pale bluey grey – is the unmodified colour on alum mordanted wool. In a wash this lost some of its blueness, and became a bit more green. The two at the back are the more greener versions from an alkaline bath.

The final surprise came as I washed the samples. The grey top, the one that had started blue-grey, became greener, obviously reacting to the pH of the washing detergent. I know dyers are meant to wash their fibres in a “pH neutral detergent”, but I have not yet come across a detergent that is so pH neutral that my natural dye samples wouldn’t react to it (even Synthrapol, the specialist textile detergent dyers use, in my experience shifts dye colours slightly towards the alkaline direction). To balance the alkaline pH of soapy water, it is often recommended that you should add some vinegar to the final rinse of wool. I rarely bother with this, but in the case of purple basil it might be necessary if you want to stop the colour turning green. Having said that, the colours on the whole do not seem very stable and the nice shades I got with acidic baths seemed to disappear by themselves over time.

My yarn skeins ended up various shades of green, although I had not specifically modified them in any way. The one in the front is alum, the darker one at the back has been modified with iron and the lightest yarn is from a second/exhaust bath.

My yarn skeins ended up various shades of green. The one in the front is alum, the darker one at the back has been modified with iron and the lightest yarn is from a second/exhaust bath.

So, all in all, if you want an interesting dyeing session, try purple basil. With wool you will not get dark colours you might initially expect from the colour of the dye bath, but if you, like me, are fond of pale mossy greens and light versions of stormy grey shades, it is definitely worth having a go.

But the best results of all you will get with silk. I am still intrigued by that beautiful plum purple that so quickly disappeared and I am wondering if there is a way of making that colour stick. Given that my plants are ready for a second harvest, I may need to have another go to find out…

3 Comments

Harvest Time

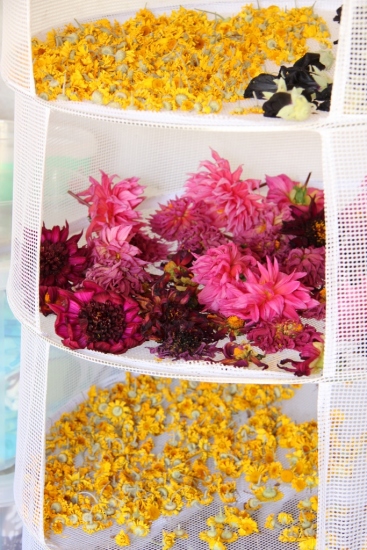
dahlias and chamomile pickedAh, harvest – that time of the year when the hard work earlier on is finally beginning to pay off. That time of the year when the greenhouse is full of cucumbers and tomatoes, and after a month of eating courgette with every meal you frantically search around the internet for any new exciting courgette recipes that you haven’t already tried (note to self: five courgette plants in a household of only two people is definitely way too many!). That time of the year, when you are just about ready to start picking all those gooseberries that you have so anticipated being able to eat, just to notice that they have suddenly been eaten by some mysterious nocturnal beastie – just like that – over night – with not a single one left.

drying flowers for dyeing

I dry many of my dye plants for later use. My netting tower is completely stuffed at the moment.

Despite some of the challenges in my dye garden that I wrote about in my last post, there is plenty of material there to be getting on with. If I am planning on using flowers for dyeing, I rarely use them fresh as I don’t often have enough at any given point for a decent batch, so I dry them and use them once I have accumulated enough. So flower harvesting has been the number one hobby this month.

After a cold first half of the year, the weather has finally realised it has some catching up to do so we have been having an unusually long heatwave here in the UK. As lovely as it would be to spend the warm evenings lounging around in a deck chair, enjoying a glass of wine, the reality hasn’t been quite like that (I suppose it never is).

The hotter it has been the more work there has been in the evenings, trying keep all my new plants watered and alive. So I have been spending my summer evenings rushing around with a garden hose, then with legs already seriously wobbly, picking up all the flowers that are past their best and trying to find a flat surface for them in the outbuilding that is not already covered with flowers.

Actually, despite the element of franticness in trying to get everything done before collapsing completely, I really do like that bit. On a sunny evening there is definitely a moment of serenity there, with the sun going down, the air cooling and my plastic crate being filled up with wonderful colours. That’s my favourite part of it all.

A month or two ago I was slightly worried that I might not have the stamina to do any dyeing this summer at all, but luckily my energy levels have picked up a little bit (perhaps it is all that sun and vitamin D) and now, after all the essential house and garden jobs (and all that plant watering) are done, there is just enough energy left over to do a bit of dyeing.

picking flowers for dyeing

picking flowers for dyeing

I love solar dyeing, just chuck stuff into a jar and leave them until you are ready to continue with the process. In this case I have pre-boiled the plant material though, as I find that decomposing plant bits can stick to unspun wool easily if you leave it for too long (as I often do).

I love solar dyeing, just chuck stuff into a jar and leave them until you are ready to continue with the process. In this case I have pre-boiled the plant material and discarded the plant bits before placing the dye liquid in the jar, as I find that decomposing plant bits can stick to unspun wool easily if you leave it for too long (as I often do).

It is going slowly, and it feels quite strenuous at the moment, so the materials are often left in dye pots for days before I have the energy for the next stage, but that doesn’t matter. That’s the thing I like about natural dyeing, it’s pretty flexible in that you can stop the process in many places and wait for a few days (or even weeks as the case may be) before you continue.

Given that it is going so slowly, I haven’t quite got to the stage where I am ready to show any actual results, but meanwhile I thought I’d give you another quick tour of the harvesting activities that have been going on.

Tagetes erecta

Tagetes erecta – as a plant not one of my favourites, looking as it does slightly stiff and pompous, but I am hoping to get some cheerful colours from it

Dahlias

I don’t know yet how good dahlias are as dye plants, but they are certainly looking very jolly at the moment

dahlias

I grow my dahlias in pots, as it makes it easier to protect them in the winter

my black hollyhocks

Of the different-coloured hollyhocks, the black one seems to be the one that makes the most interesting dye colours. This is my first ever batch, so I am so looking forward to giving it a go!

black hollyhock

Black hollyhock, Alcea rosea nigra

Japanese indigo needs a long warm season to make seeds, so I am growing one of my plants in a pot so that in the spring and autumn it can be kept in the greenhouse.

Japanese indigo needs a long warm season to make seeds, so I am growing one of my plants in a pot so that in the spring and autumn it can be kept in the greenhouse.

The greenhouse treatment seems to be working as this one is beginning to flower already

The greenhouse treatment seems to be working as this one is beginning to flower already

You can tell a Japanese indigo is ready for harvesting when you can start seeing little blue spots in the leaves, especially where they have been bruised or damaged.

You can tell a Japanese indigo is ready for harvesting when you can start seeing little blue spots in the leaves, especially where they have been bruised or damaged. I have harvested some of the leaves of this one already, but that’s a subject of another post…

Purple loosestrife (Lythrum salicaria). I am not picking the flowers of these, they are far too pretty, but I'll use the whole plant in the end of the season

Purple loosestrife (Lythrum salicaria). I am not picking the flowers of these, they are far too pretty, but I’ll use the whole plant in the end of the season

Eucalyptus gunnii is supposedly hardy in the UK, but I am growing it in a pot just in case so that I can take it to the greenhouse in the autumn

Eucalyptus gunnii is supposedly hardy in the UK, but I am growing it in a pot just in case so that I can take it to the greenhouse in the autumn


5 Comments

Trouble at the Dye Garden

Now I am not a superstitious person, but I am seriously beginning to think there is an evil curse on my brand new flower bed, which was especially created so that I have more room to grow dye plants. So far, nothing that I have tried to grow on that bed has actually been successful.

My new dye plant border is not looking good this summer…

I spotted the first signs of trouble after the first plants were planted there. These were some dyer’s chamomile and hollyhock plants that were transferred there from a raised bed where they had previously been growing quite happily. On the new bed, they just sulked, they literally have not grown at all since they were transplanted a few months ago.

Ailing chamomile

Hollyhock that refuses to grow

Hollyhock that refuses to grow

Then, I tried to sow some woad and purple fennel seeds there. None germinated, not a single seed. I must admit that this might have been my own fault. I sowed the seeds during a dry spell, and although I did water them (occasionally), perhaps I just didn’t do it enough.

But I also started to suspect there might be a problem with the soil. The soil around here is incredibly thick and sticky clay, and I knew that to have any chance of growing anything in it I’d need lots of extra compost as a soil improver.  Someone told me that the best way to improve heavy clay would be to use fully composted bark to improve the structure. So I bought a truck load of the stuff, and on my other flower beds it has worked very well as a mulch, it does a good job suppressing weeds. But perhaps it was a mistake to use it when establishing a new flower bed? Perhaps it doesn’t contain enough nutrients, and so it’s not the ideal stuff to be dug in? I don’t know if that is the case, but clearly something had to be done so I bought some standard compost and had the bed completely dug over again with lots and lots of this new compost added in.

So after this I dared to plant some plants into the bed again. I planted some tickseed, tagetes and purple loosestrife that I had grown from seed in the greenhouse. But only a few days after, I noticed that most of the tickseed had been eaten, probably by rabbits . It was too late to take any action right then, and the following morning when I went back, the rest were, as I had feared, completely devoured and some of the purple loosestrife had been nibbled too. Of course I knew there are rabbits about (they are very cute, sweet-looking bunny rabbits and there are a lot of them), but on the whole they have left my perennials alone. Fruit trees get nibbled instantly, but perennials, for some reason, have been spared. Now I know it was only because they are fussy eaters and were only waiting for me to offer them juicier types of plants. Tickseed, preferably.

An ex-tickseed

An ex-tickseed

If I am completely honest with myself, I do know what the curse afflicting my dye garden is called. It’s the “Curse of the Inexperienced and Over-Enthusiastic Gardener“. No matter how many garden books you read, gardeners have to make their own mistakes before they learn. Not that I am a complete novice with gardening – I have spent over ten years of making all manner of gardening mistakes – it’s just that I have only had a garden bigger than a postage stamp for a few years, and at my rate, I reckon I need at least ten more years of intense practising and more mistake-making before I can be more certain of reliable success.

And one lesson I need to learn straight away is not to make over-ambitious plans, not to attempt so much that I will be rushing and taking short-cuts, hoping that I can get away with them (because I probably won’t). It’s easy enough to grow lots of plants from seed, but you need the time and the energy to plant them on before they start suffering in pots that are getting too small, water them properly for weeks afterwards and protect them from all kinds of beasties big and small (ideally before the plants get completely devoured). And this year,  poor health hasn’t made it easy to keep on top things either (which is the reason why I have been rather quiet on the blogging front recently).

But luckily, it hasn’t all been a failure. Some of my other dye plants have grown well and even on the health front I have picked up a little bit over the last couple of weeks, so I am hoping I’ll finally get a chance to do some dyeing this week. So lets hope I’ll be able to report some more successful results to you soon!

But if all else fails, you can always rely on nettle

But if all else fails, you can always rely on nettle to do well