
This week there’s been a hint of spring in the air and we haven’t even had a storm for a whole week, which makes a nice change. In the garden it is starting to feel like the beginning of a new season. But before I get too enthusiastic about making plans for a new dyeing season, I want to take a moment to show you what I achieved last year.
I had many ambitious dyeing plans for 2013. I wanted to try some plant-based mordants like rhubarb leaves and willow, I wanted to try dyeing new fibres like silk and cotton. And there was a very long list of dye plants that I was going to grow and dye with. Well, as so often happens in life, it didn’t quite work that way. After a serious relapse with my ME/CFS in the spring, for a while it looked like I might not be well enough to do any dyeing at all.
But by July, I had picked up sufficiently to make my way back to the dyeing shed again. Even so, doing the dyeing process the usual way over a day or two was still too strenuous for me to manage, so instead, I broke it down into lots of smaller steps, and did each step on a different day. For example, normally you would pick your plant material, chop it and then proceed to simmer it straight away, but I wouldn’t have the stamina to do both of them on the same day. Instead, I would pick and chop the plan stuff, put it in a pot and cover it with water, then wait for few days before continuing. This way the process might have been frustratingly slow, but with this illness you just need to learn to be patient. It’s either that or not do anything at all…
So with some very careful planning and lots of self-discipline (to stop myself over-enthusiastically overdoing things and flattening myself as a result) I managed to have a couple of reasonably good months of dyeing before the autumn arrived and my energy levels collapsed again. In the end I did not get to try rhubarb or willow mordants, or cotton dyeing for that matter, but I did get to try silk and several different dye plants that I hadn’t worked with before: purple basil, cutch, annatto, Lady’s Mantle (Alchemilla mollis), dahlia, tagetes, black hollyhock, Japanese indigo as well as my first mushroom dyeing experiments with Cortinarious semisanguineus. Some of these I have already written about, the others are still on the To-Do List waiting for a spare moment.

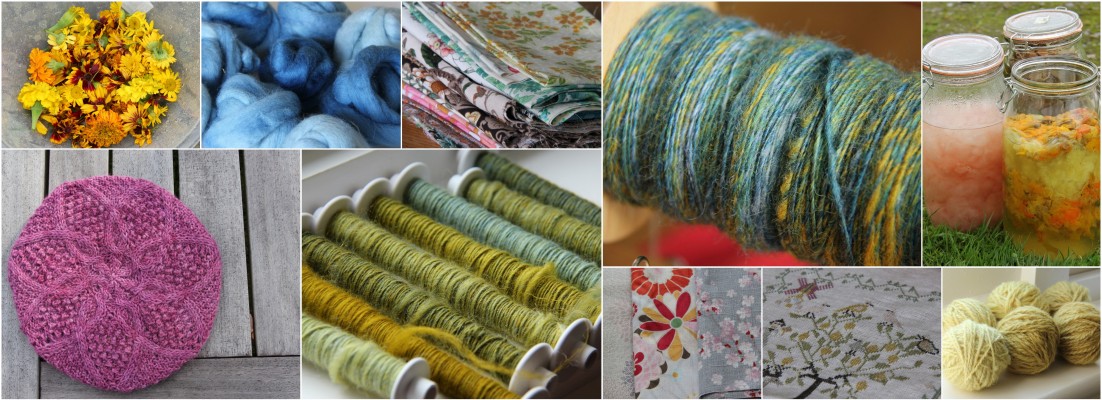
A year’s worth of dyeing experiments. Finnsheep top, all in naturally dyed colours.
My plan was to focus was on experimenting with as many different dye plants as I possibly could, and try to see how many colours I could get from each one of them. I would vary the colours by trying different mordants (alum and copper) and different modifiers (iron, acid and alkaline baths). I was very much in a sampling mode, and to keep the costs (as well as my stash) under control, I didn’t dye anything in large quantities. For sampling I used small pre-felt squares as they are quick and economical to prepare.
As I was focusing on small quantities, I also thought it would be an ideal year to dye some embroidery threads. So I spent the spring when I was too unwell to do anything that requires lots of brain power making lots and lots of mini skeins in both silk and wool that during the summer got thrown into the dye pot along with my usual Finnsheep top. The woollen yarn was intended as a Christmas present for my dad, who likes using wool in his needlework projects.
Given that I was trying to produce lots of different colour variations on several different types of materials, I had to devise a good system for keeping track of what exactly I was doing (especially since my memory is like a sieve, and I easily lose my concentration if I get overtired). But after a few weeks of dyeing I had established a method that worked for me. After a dye bath had been prepared, I would divide it into two lots: one for alum mordanted materials and another for copper mordanted ones. Into each alum pot I would throw in 5 pre-felt squares, 5 skeins of silk in two different weights, two skeins of wool and some Finnsheep top. The copper pot would get the same except the top (I chose not to mordant my top with copper, as I wanted to keep the copper mordanting quantities as small as possible, as it is more toxic than alum).
Then, after dyeing, I would set aside one alum mordanted piece of each type of material, and then modify the rest using acid, alkaline, iron and copper. The copper samples would get the same treatment (except the copper modification which would obviously be pointless). As a result, for each dye, I would get 5 different shades from alum and 4 from copper, both in silk and wool. And obviously the dye bath could be re-used a few times, which would get you another lot of colours but in a lighter value. To keep track of all these different versions I use numbered and coloured pegs (having said that, I did lose track quite a few times and ended up with random colours that I had no idea of how they had been produced).

My bathroom after a typical dyeing day. I use plastic pegs as labels to keep track of my samples.
I decided against modifying my spinning wool in any way. This is because colours modified with acid and alkali are not always stable and they easily change in the wash. I know it is recommended that you use a pH neutral detergent, but I’ve never found a detergent so neutral it doesn’t affect the colours, especially the ones that have been modified with acid. To keep the acid-modified colours, you would need to rinse them with vinegar after every wash. But if you combine acid and alkaline colours in the same project, this obviously isn’t possible. When I spin wool, I like blending different colours on my carder, so it would be waste of effort to create lots of tonal variation that you are just going to lose afterwards in a wash. Colours modified with iron are more stable, but I am slightly worried that if I combine iron-modified colours with plain alum ones, the residual iron might contaminate and sadden the alum colours (although I must say I have never tested if this really happens). But for all these reasons, I stuck to alum colours only with my spinning wool. It is always possible to use iron afterwards for specific projects if necessary.

Another lot of dyeing results waiting to be photographed
After about two months of these experiments, I started getting a bit impatient and even bored of my method of trying one new dye plant after another. I seemed to be getting an endless amount of mustard yellows and golden browns – nothing wrong with these colours at all, but lets face it, there’s only so much you really need. And so I noticed my thinking was beginning to shift: I no longer wanted to tick off as many plants from my list as I possibly could, I felt that I had done enough of that. Rather than structure the process around plants, I realised it would be far more useful start focusing on colour families and the colour circle – blues, reds, yellows as well as all those colours that require over-dying like grassy greens and purples.

Wool yarn dyed for my dad’s needlework projects
But by the time my thinking had evolved to this point, it was late autumn, the weather was getting colder and wetter and it was not quite as much fun to hang around in the dyeing shed anymore. And my strength was beginning to diminish again, each dyeing session (especially the indigo ones) would leave flattened for days and I realised that it was probably best to stop for now and wait for times when I have more stamina again.

Blues, greens and yellows (the greens are various yellows overdyed with indigo)

Muted tones
So all in all, it was a good year of dyeing and I learned lots. If and when I am well enough to start the process again, I will definitely be focusing on a smaller set of dye plants (perhaps those classic ones that are known to be colour-fast) and experimenting with producing more complex colours by over-dyeing. I already made a good start with over-dyeing yellows with indigo to produce bright greens, but learning to create purples with conchineal and indigo will be on my list too. And maybe I will get round to trying cotton dyeing too…

Embroidery Silks

Embroidery silks in muted colours.
Many dyes turned out to be more muted in silk compared to wool (although in some cases it was quite the opposite – the silk picked up the colour much more strongly than wool).

Indigo dyed blues and greens on silk


