
This spring I’ve had a go at solar dyeing for the first time. The method suits me very well – after preparation, you can just leave the jars for a few weeks until you are happy with the colour, or more likely, until you have a spare moment to deal with them again.
The method is remarkably simple. I had washed and mordanted the yarns with alum and cream of tartar in advance (apparently you could put the mordant in the jar too, although I haven’t tried this method so I’m not sure how well it works). As I had been dyeing with madder and brazilwood, I already had dye liquid I could use so I just half filled my pickling jars (found on eBay) with the dye liquid and added some wool, closed the lid and left the jar in my green house for some weeks (I think they were there for over a month as I was busy with other things).

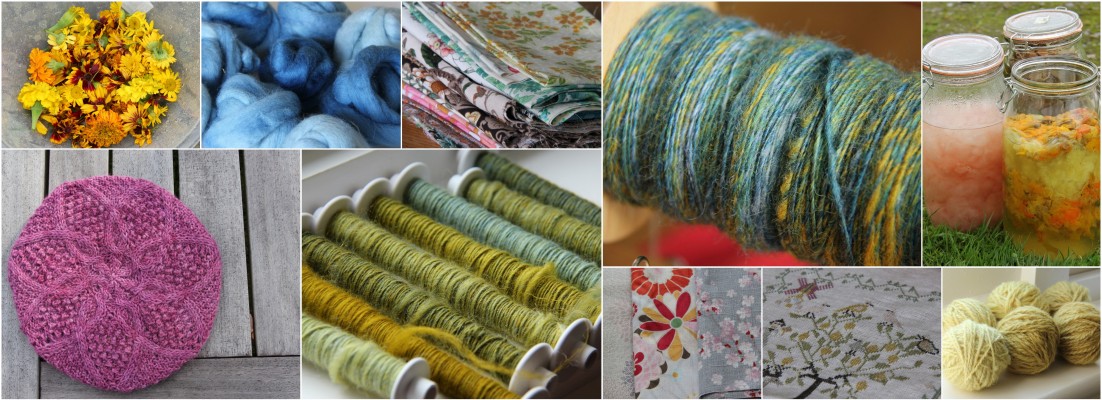
Solar dyeing with brazilwood rinsing water (left) and daffodil
The brazilwood dye liquid was in fact the rinsing water I had rinsed my previously dyed wool in – it is just amazing that there’s still enough dye in it to dye wool a lovely shade of pink. And it’s great there’s an easy way to use such left overs and nothing goes to waste.
As it was the height of daffodil time when I was doing this, and we have hundreds of daffodils growing in our garden, I picked some daffodil flowers (ones that were past their best), poured boiling water from a kettle on them and left it for a few hours before preparing the solar dyeing jar. I put some flowers at the bottom, then some wool and some flowers at the top. This method produced a really lovely gentle yellow, but after a few weeks the flowers went rather slimy and it was difficult to rinse them off the wool fibre, so I wouldn’t necessarily recommending this method with unspun fibre.
I also used nettle and ivy, following the same method as with the daffodil flowers. The nettle went quite slimy too and again it was difficult to rinse the plant bits from the fibre. Ivy leaves, being more sturdy, didn’t go slimy and so I had less of a problem with getting them off the wool.
Daffodil, nettle and ivy all gave me various shades of yellow. My favourite one was the daffodil, it was a lovely buttery shade but quite strong nevertheless, so I will definitely use them again next spring.

Another problem I had was that some jars developed some mold over the weeks. It only developed on the surface, so most of the wool was unaffected. I know I could have brought the wool to a simmering point to kill the mold but that sort of defeats the point of solar dyeing. Excluding air from the surface would probably help to prevent the problem. One way to do this would be to fill the jar all the way to the top but it’s not a good idea to do this because the liquid needs room to expand as the temperature rises. I might try putting a piece of plastic on the surface next time and see if this makes a difference at all. If you have any good tips for preventing mold, please let me know!

May 19, 2012 at 11:10
Lovely colors! It’s an interesting dyeing method.
May 21, 2012 at 11:14
Hei Barbro, I agree it’s an interesting method and definitely worth it for those who are not in a hurry. Another great “slow craft”!
July 25, 2012 at 20:53
I’ve been thinking about ways of stopping the mold both for solar dyeing and for long extractions. Aside from using alcohol (which is great for extractions, but maybe not so much for solar dyeing…?) I’m wondering how salt or essential oils would work. I’m planning some experiments with salt—I’ve learned that it’s supposed to aid in extractions and also is supposed to be a good colour leveling agent in dyebaths. I have no idea if essential oils would work against mold or if they’d mess up a dyebath, but I think it would also be worth a try. I tried laying plastic wrap directly on the surface of some bark extractions I did, and it did NOT stop the funk from developing. I think it’s because many plastic wraps are still somewhat oxygen-permeable.
July 26, 2012 at 15:51
Thank you for the tip about a plastic wrap not working, I was going to try it next 🙂
Salt might be worth trying though. It is of course used in acid dyeing as a levelling agent, and I do get some mold on my used acid dye baths (which I keep for reusing the water for dyeing similar colours) but perhaps not quite as much as with natural dyes, but then there are all sorts of other chemicals there too which might have an effect.
Essential oils, now there’s an interesting idea. Tea tree oil, being anti-fungal for example might be worth trying (is mold a fungus??). Please do let me know if you come up with a method that works, I’d love to know!
August 14, 2012 at 22:04
I have used the solar dye method many times and haven’t had a problem with the vegetable matter going moldy. I think if you make sure your jar is packed tight with fibre and dye material and then put the liquid in and the lid on & make sure you don’t have any excess air in it, it will be fine. This is what I do. My chickens have even been known to eat the exhaust material when I put it on the compost heap! Hopefully that might help.
August 15, 2012 at 10:31
Unlike you I left a gap in the jar for the water to expand when it heats up, so this probably explains why I got mould and you didn’t. I will try your method next time, so thank you very much for the tip 🙂
June 16, 2014 at 13:54
The molds can actually be used to adjust the colors. My fuschia pink yarn turned red in the jars with molded. And the blue wood fungus gave a fantastic spruce color after getting moldy.
June 16, 2014 at 15:58
that’s really interesting to hear, perhaps it depends on the type of dye plant you’re using? The mold on my jars was just dark matter sitting on the surface of the wool, so didn’t really offer any great artistic opportunities.
March 3, 2019 at 04:42
I am trying seashells to keep the wool below the water line. Or you could use a rock. This idea stems from my experience with aerobic fermentation.
March 3, 2019 at 06:53
Thank you for the tip, Nicole! 🙂